Have you ever wanted to create an amazing Kodi add-on by yourself? Great, but you first need to learn the basics. Every programming language (or software in our case) has its basic program called Hello World. This tutorial will teach you how to create your first add-on as the first step in learning how to develop complex Kodi add-ons. It doesn’t require any prior knowledge.

Before starting, you need to have two things ready:
- Kodi installed on your device
- Text editor. We recommend using Notepad++ that you can download from here.
Installing the Hello World add-on:
- In this tutorial, you will use our Hello World add-on. Download this add-on as a ZIP file from here.
- Launch Kodi
- Click Add-ons
- Click the Add-on browser icon

- Click Install from zip file
- Locate where you downloaded the file and select script.hello.world-master.zip
Testing the Hello World add-on:
- Go back to the Kodi home page
- Click Add-ons
- Hover over Program add-ons
- Click on the Hello World add-on. Once clicking the add-on a popup appears with three lines of text
The structure of the add-on:

The add-on contains several files and a directory located in the AppData folder. For Windows it is found under this location: C:\Users\<username>\AppData\Roaming\Kodi\addons\script.hello.world
Those files include the following:
- resources – This directory contains images for the add-on information screen
- addon.py – The code of the add-on
- addon.xml – The metadata of the add-on
- changelog.txt – The changelog of the add-on containing information about every release
- fanart.jpg – The background image of the add-on that appears when hovering over it or after launching it. We recommend a 1280×720 JPEG file
- icon.png – The icon of the add-on. Must be a 256×256 or 512×512 PNG file
- LICENSE.txt – The license of this add-on
- readme.txt – This file contains information about the add-on
The metadata of the add-on (addon.xml):
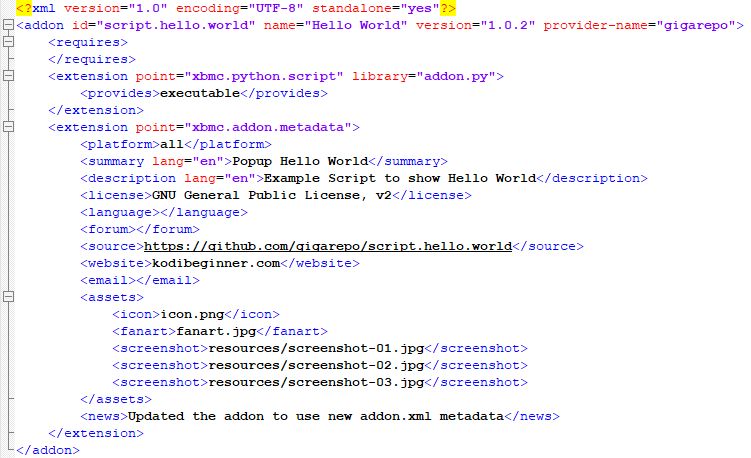
You can see here the metadata of the add-on which is in XML format:
- The addon tag – includes details about the add-on including ID, name, version and author. The ID should be unique
- The require tag – describes which code should be imported by the add-on. In our case, nothing is required
- The extension tag is used twice, each one with a different point:
- The first one defines the type of the add-on which is executable
- The second one defines the metadata of the add-on, which includes fields like platform, description, license, language and more
The code of the add-on (addon.py):
You can see here the code of the add-on written in Python. To start learning Python, we recommend learning from this tutorial.

Here is what every line of code means:
- Lines 1-2 import the necessary code for this add-on
- Line 4 declares that this is an add-on
- Line 5 assigns to a variable the name of the add-on (taken from the name field of the metadata file) that is displayed in the title of the popup
- Lines 7 and 10 are comments. In Python, comments start with the # character
- Line 8 contains the text of the popup. In Python, newlines are represented by \n
- Line 11 opens the popup with the title, text and OK button
Change the code of the add-on:
After you understand the structure of the add-on it is time to change it a bit.
You first need to extract the ZIP file of the add-on to a folder so you can edit the files inside of it.
Edit this file addon.py using Notepad++ and replace line 8 with the following line of code:
line1 = "My first add-on works well!\nGoodbye"
Save the file and compress the folder to a ZIP file. Now you have the add-on with your updated code.
Test the add-on. You will see that the text in the popup was changed according to the changes made by you.
Congratulations, you just created your first Kodi add-on!
What’s next?
You have just finished your first Kodi add-on that was basic and simple. In the next tutorial, you will learn to use arguments, add a menu to Kodi add-ons and expand your knowledge.
